The store will not work correctly in the case when cookies are disabled.
Privacy settings
This website and third parties would like to store or access information on your terminal device, e.g. on your PC, in particular using cookies and similar technologies. This serves to optimize the website, ensure its functionality and create user profiles as well as to display interest-based advertising. Your personal data is also processed in this context.
These recipients may process your personal data for further purposes of their own, as part of a joint controllership with us or as our data processors.
By clicking "Accept", you explicitly consent to the storage of and access to information on your terminal device as well as to the processing described above.
You can withdraw your consent at any time with effect for the future by providing your "ID to request consent data". You can find the configuration options and further information, including on the storage period of cookies by clicking on "Details". Further information, in particular also on your rights of withdrawal and to object, can be found in the privacy policy and in the legal notice.
Ding Dong! It’s time! The shipping company is at the door and your acoustic panels are being delivered. Now it's time to roll up your sleeves and get to work. Here we show you a step by step guide on how to install your new absorbers.
Five important facts before ordering /
installation
Your new absorbers should solve your individual room acoustics problem for the long term. Therefore, think about a few basic points before you order or manufacture the modules.
Which room do
you want to use the acoustic modules in? What purpose do they have?
Do you want to reduce unwanted reverberation in the living room, optimise the sound of the hi-fi system or put a stop to office noise? → Acoustic absorbers are the right solution.
Do you want to prevent the sound from your home studio or home cinema from disturbing your neighbours? → To solve this acoustic problem, you have to think about the right sound insulation.
Do you hear every step the neighbours above you make? → This is a structural issue where only the right insulation can provide relief.
Is there a direct source of noise that you want to silence?
Often so-called direct sound is perceived as noise: for example, the rattling printer or your office colleague’s phone discussions.
The basic rule: if your eye can see it, your ear can also hear it. The sound in the room is transmitted directly to the ear without shielding. Acoustic partitions can make a big difference here.
Is there reverb you want to reduce and if so, where is it coming from?
Not an easy question to answer. The most important thing here: in addition to direct sound, there are sound reflections as sound is reflected back into the room from walls, ceilings, and furniture.
With different methods (e.g., the mirror method) you can find out how to place your acoustic absorbers effectively to avoid sound reflections.
How many absorbers or how much absorber surface do you
need?
Of course, it is precise if a professional acoustician measures the reverberation time and calculates the required area for your room.
As an alternative, we offer you our acoustic calculator, with which you can estimate how many modules you need by means of an audio sample.
For an initial estimate, you can use the following rule of thumb calculation:
Light reverberation: 10% of the wall and ceiling surface as absorber surface
Increased reverberation: 15% of the wall and ceiling area as absorber area
Strong reverberation: 25% of the wall and ceiling surface as absorber surface
Upright? Alongside edges? Ceiling? Wall? How do you want tomount your Silentum absorbers?
It is essential to pay attention to the desired installation method when selecting the panels.
Wall mounting vs. ceiling mounting: The mounting profiles for the two mounting types differ to ensure optimum stability for the respective application.
Horizontal alignment vs. vertical alignment of the panels: The mounting strips on the back of the absorbers are already put into place by our workmanship. For the alignment to be correct, we need to know whether you want to mount the panels vertically or horizontally.
Alignment of panels with lamella felt: Please also pay attention to the desired seam direction of the lamellae. Depending on the module, these run either over the module width or over the module length
Absorber mounting on wall and ceiling
Once you have chosen your absorbers correctly and your delivery has arrived safe and sound, you can get started with the installation.
Necessary tools
Drilling machine (possibly with extension cable)
Hammer
Cordless screwdriver (or drill with screw attachment)
Possibly: a ladder
Necessary fastening material
Screws (min. 5x60mm)
Dowels (Ø min. 8 mm)
Make sure that the fastening material is adapted to your substrate (e.g., cavity dowels for plasterboard walls etc.).
Important processing instructions:
When cutting, make sure that no chips get onto the felt surface, as these can stick very strongly to the wool.
At least one other person is required to install the panels. Two more people are recommended for installing larger sizes.
Schritt: Holzplatten vorbereiten
Schritt: Kleber auftragen
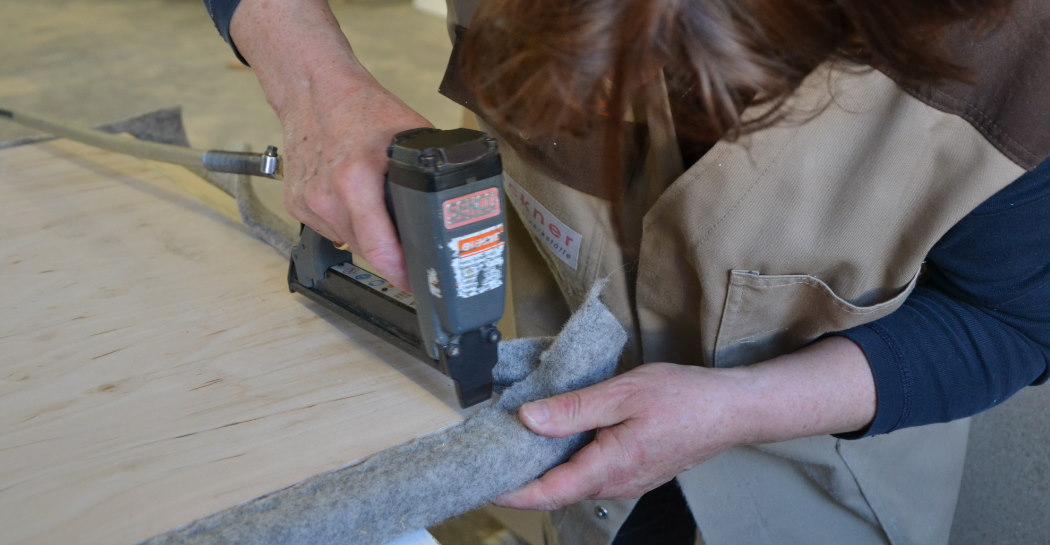
Schritt: Akustikfilz tackern
Drehe die Platte vorsichtig um und klappe den überstehenden Akustikfilz um. Fixiere den Filz mit dem Tacker und setz die Klammern dabei dicht aneinander.
Schritt: Überstände abschneiden
Overview wall mounting and
ceiling mounting
If you wish, acoustic absorbers are equipped with the appropriate wall or ceiling mounting kit.
Mounting set WALL
Mounting strip 1 is attached to the panel at the factory.
Mounting strip 2 is mounted on the wall by you
Wall mounting vertical
Attaching the strips to the wall for vertical installation (using absorber module 2 as an example)
Wall mounting horizontal
Attaching the strips to the wall for horizontal installation (using absorber module 2 as an example)
Lamella panels Wall mounting vertical
In the case of lamella panels, the running direction of the lamellae changes depending on the mounting direction.
Lamella panels Wall mounting horizontal
Due to the different running directions, there is also a module 05 in addition to module 02. Both panels have the same size, but a different slat running direction.
Mounting set CEILING
Mounting strip 1 is attached to the panel at the factory.
Mounting strip 2 is mounted on the wall by you.
Ceiling mounting vertical
When it comes to ceiling mounting, with normal felt panels, the only thing that matters in the end is how you want to attach the mounting strips.
Ceiling mounting horizontal
For lamella panels, in addition to the direction of the mounting strips, the running direction of the lamellas is again important. Therefore, before ordering and mounting, check exactly what the direction should be.
Step by Step
Assembly steps with
prefabricated assembly sets
The given grid size allows you to install all the fastening strips first and then hang the panels. Proceed as follows:
1. Follow the assembly instructions: Appropriate assembly instructions are included with each order.
2. Measure the distances: To slide the panels in later (step 5), you'll need some clearance to manoeuvre:
For wall mounting, plan an additional wall clearance of about 4-5 cm from the top.
For ceiling mounting, you need an additional distance of about 5-6 cm to the sides of the walls.
There are already drill holes on the mounting strips on the panels. Use them to draw the corresponding locations for the holes on the wall.
3. Drill the holes: Drill the holes for fixing the mounting strips in the wall or ceiling.
4. Place the dowels: Use a hammer to sink the dowels flush into the wall or ceiling.
If the masonry is poor or sandy, you should fix the anchor with glue.
5. Hook in absorber:
Since the mounting strips are attached to the absorbers at the factory, a very quick installation is possible:
For wall mounting: Lift panel by panel onto the wall and let each one slide from top to bottom into the wall mounting.
For ceiling mounting: Lift panel by panel to the ceiling and let each one slide into the ceiling suspension.
6. Fixing: For ceiling mounting, place a screw on each profile side of the mounting strips to secure the absorbers against unintentional movement.
This is not necessary for wall mounting.
Alternative mounting options
If you have ordered your absorbers without a mounting set, you can choose an alternative mounting option. Many partners or customers of ours have, for example, opted for mounting with chain or wire rope suspension, or used the panels as partition walls or mobile wall elements by means of feet.
Montagebeispiele
Zur Inspiration haben wir dir hier ein paar Beispiele zusammengestellt, die dirzeigen, wie sich die verschiedenen Silentum-Module (M01-M08) kombinieren lassen. Was hier im erfrischenden Grün dargestellt ist funktioniert natürlich auch in vielen anderen Farbwelten.
Und der Vorteil: dank der flexiblen Montageschienen kannst du die Module auch umhängen und so für etwas Abwechslung sorgen.
Verwendete Akustikmodule (von links nach rechts und von oben nach unten):
Akustik optimieren und ein gesundes Raumklima schaffen
Mit den Silentum Schafwollprodukten bieten wir ein breites Spektrum an akustischen Produkten an. Nicht nur der Schallabsorbtionsgrad überzeugt: Ein extra Plus sind die gesunden Eigenschaften der Schafwolle, die dein Raumklima verbessern. Ob Lamellen- oder Akustikfilz als Meterware oder bereits rundum fertige Absorber-Module, du hast die Wahl - sieh dich in unserem Shop um.